Monday 28 May 2012

Broadcast Receiver: Two ways to implement part-2

In the previous tutorial, we discussed how to implement/register broadcast receiver inside an activity. Broadcast receiver is a standalone application component which means it will continue running even when other application component are not running. That's why we unregister broadcast receiver in onPause on the activity.

Second way of using broadcast receiver is to register it inside manifest.xml. When registered (and not unregistered) broadcast receiver exists as long as application exists. There could be many use cases of using broadcast receiver this way. These could be waiting for specific event to occur and start/stop other application component upon the occurrence of that event, initiate network communication or communicate with contentprovider . . .etc.

This is pretty simple to implement. We need to register it using receiver tag in manifest.xml and define its intent-filter (same as we did in activity).


<receiver
      android:name=".IndependentReceiver"  >
     <intent-filter>
         <action android:name="sohail.aziz.r2" />
      </intent-filter>
 </receiver>


Lets define the broadcast receiver itself:


public class IndependentReceiver extends BroadcastReceiver {

    @Override
    public void onReceive(Context context, Intent intent) {
        // TODO Auto-generated method stub
        
        int recval = intent.getIntExtra("counter", 0);
        Log.d("sohail", "independentreceiver: broadcast received with counter="+recval);
        
    }

}


Now we can send broadcast to this receiver with action sohail.aziz.r2  e.g
  
  Intent in = new Intent();
  in.setAction("sohail.aziz.r2");
  in.putExtra("counter", 202);
  Log.d("sohail", "onHandleIntent: sending broadcast");
  sendBroadcast(in);


Notice that as we are not unregistered this receiver, so it will continue running throughout the application life.
Browse and Download source BroadcastExample.

Friday 25 May 2012

Broadcast Receiver: Two ways to implement part-1

I got confused while learning about the broadcast receiver after browsing around the web. Some people register it inside activities while other register it in manifest. The purpose of this tutorial is to explain both ways and the use-cases when to use which implementation.

Broadcast receiver is an application component like activity and service. Its sole aim is to listen for broadcast for which it is registered (through intent-filters). Broadcast receiver can receive broadcast from android system, other applications and from inside the application. Read more about broadcast receivers at developer.android.

We can register receiver in manifest.xml or inside an Activity. We should use define and register broadcast receiver inside activity if we want perform action related to activity (e.g updating UI). We should define it in standalone class otherwise.

No matter what your use-case is, Lets see how to implement these two ways. Lets say we have BroadcastExampleActivity and a receiver inside it called Myreceiver:


public class BroadcastExampleActivity extends Activity {
    /** Called when the activity is first created. */
    private Myreceiver reMyreceive;
    private IntentFilter filter;
    @Override
    protected void onPause() {
        // TODO Auto-generated method stub
        super.onPause();
        unregisterReceiver(reMyreceive);
     }
     @Override
     protected void onResume() {
        // TODO Auto-generated method stub
         super.onResume();
        
          registerReceiver(reMyreceive, filter);
     } 

    @Override
    public void onCreate(Bundle savedInstanceState) {
        super.onCreate(savedInstanceState);
        setContentView(R.layout.main);
        
        Log.d("sohail", "onCreate called");
       
        reMyreceive=new Myreceiver();
       
       //typo mistake 
       //Edited after pointing out by a reader, thanks 
       // IntentFilter filter=new IntentFilter("sohail.aziz");

        filter=new IntentFilter("sohail.aziz");         
       
        Intent i= new Intent(this,MyIntentService.class);
        Log.d("sohail", "starting MyIntentservice");
        startService(i);
    }
    
    public class Myreceiver extends BroadcastReceiver{

        @Override
        public void onReceive(Context context, Intent intent) {
            // TODO Auto-generated method stub
            
            Log.d("sohail", "MyReceiver: broadcast received");
        }
        
    }
} 


Note that while implementing inside activity, receiver should be registered in OnResume() and unregistered in OnPause() in order to "cut down unnecessary system overhead- developer.android". [Otherwise your receiver will continue running even when activity get paused! check example in updated source]. Intenfilter("sohail.aziz") is the action name for which this receiver is listening. Broadcast sender must set the action name for intended recipient. Lets define MyIntentservice which will send the broadcast.


public class MyIntentService extends IntentService{

    public MyIntentService() {
        super("MyIntentService");
        // TODO Auto-generated constructor stub
        
        Log.d("sohail","Myintentservice constructor");
    }

    @Override
    protected void onHandleIntent(Intent arg0) {
        // TODO Auto-generated method stub
        
        Log.d("sohail", "onHandle intent called");
        
        try {
            Thread.sleep(1000);
        } catch (InterruptedException e) {
            // TODO Auto-generated catch block
            e.printStackTrace();
        }
        
        Intent in= new Intent();
        in.setAction("sohail.aziz");
        Log.d("sohail", "onHandleIntent: sending broadcast");
        sendBroadcast(in);
     
    
    }

}


Notice that we are sending broadcast here with action "sohail.aziz", this is the same action name for which we set intentfilter in our broadcast receiver. Now when broadcast is sent by sendBroadcast, Myreceiver onReceive will be called and intent will be passed to it. You can pass anything via intent. This way we don't need to register receiver inside manifest.xml as it has become a sub component of the activity.

Second method: Broadcast Receiver: Two ways to implement part-2


Wednesday 23 May 2012

A complete Contentprovider


MyContentProvider
Much have been written about contentproviders and there are various tutorials and examples available. I walk through many of those tutorials during my learning of custom contentprovider. However none of those tutorial gave me complete and clean implementation details.
Aim of this post is to show you a complete [all necessary function implementation] and clean [well organized code for better understading] custom contentprovider.

A contentprovider is primarily designed to use for data sharing between different application. A contentprovider provide a transparent interface for structured data storage. A contentProvider  could be implemented with many different backends like SQLite, file storage or network storage. This tutorial addresses the implementation details of contentProvider implemented with SQLite database.


Lets start with an example. We have a Category class e.g
public class Category{ 
  String name;
 String status; 
}
We want to insert and get these fields in contentprovider. For this will create a content discriptor for our content provider. Lets say it Mycontentdiscriptor:


public class MyContentDescriptor {

    public static final String AUTHORITY = "sohail.aziz.mycontentprovider";
    private static final Uri BASE_URI = Uri.parse("content://" + AUTHORITY);
    public static final UriMatcher URI_MATCHER = buildUriMatcher();

    private static UriMatcher buildUriMatcher() {

        // TODO Auto-generated method stub

        final UriMatcher matcher = new UriMatcher(UriMatcher.NO_MATCH);

        // have to add tables uri here

        final String authority = AUTHORITY;

        //adding category Uris

        matcher.addURI(authority, Categories.CAT_PATH, Categories.CAT_PATH_TOKEN);

        matcher.addURI(authority, Categories.CAT_PATH_FOR_ID,Categories.CAT_PATH_FOR_ID_TOKEN);
     
        return matcher;

    }
    public static class Categories {

        // an identifying name for entity

        public static final String TABLE_NAME = "categories/"; 
        // the toke value are used to register path in matcher (see above)
        public static final String CAT_PATH = "categories";
        public static final int CAT_PATH_TOKEN = 100;

        public static final String CAT_PATH_FOR_ID = "categories/#";
        public static final int CAT_PATH_FOR_ID_TOKEN = 200;

        public static final Uri CONTENT_URI = BASE_URI.buildUpon()
                .appendPath(CAT_PATH).build();

        public static class Cols {
            public static final String cat_id = BaseColumns._ID;
            public static final String key_2_catname="name";
            public static final String key_3_catstatus="status";

        }
    }
}

Lets discuss the above code.
Authority: A content provider must have an Authority. Authority string must be included in manifext.xml file in order to use contentprovider. You can define it as you like.
UriMatcher : A uri matcher is used to match the URI's. Uri could be of a table or speceific row (record). For example in our case category table uri is:

content://sohail.aziz.mycontentprovider/categories


while uri for particular record in categories table could be: 


  content://sohail.aziz.mycontentprovider/categories/1


we defined two constants for these two different URI types in order to differentiate while querying.
Cols class is defining the fields of our Category object. First field of every table should be _ID. As its expected while binding to listView.

So far we were defining our content, lets create actual SQLite database to be used as backend with our contentprovider:

public class MyDatabase extends SQLiteOpenHelper {

    private static final String DATABASE_NAME = "mydatabase.db";
    private static final int DATABASE_VERSION = 1;

    // custom constructor
    public MyDatabase(Context context) {
        super(context, DATABASE_NAME, null, DATABASE_VERSION);
        // TODO Auto-generated constructor stub
    }

    @Override
    public void onCreate(SQLiteDatabase db) {
        // TODO Auto-generated method stub

        // creating tables categories
        db.execSQL("CREATE TABLE " + MyContentDescriptor.Categories.TABLE_NAME+ " ( "+
                 MyContentDescriptor.Categories.Cols.cat_id+ " INTEGER PRIMARY KEY AUTOINCREMENT,"+
                 MyContentDescriptor.Categories.Cols.key_2_catname    + " TEXT NOT NULL," +
                 MyContentDescriptor.Categories.Cols.key_3_catstatus + " TEXT," +
                "UNIQUE (" + 
                MyContentDescriptor.Categories.Cols.cat_id + 
            ") ON CONFLICT REPLACE)"
                );

    }
    @Override
    public void onUpgrade(SQLiteDatabase db, int oldVersion, int newVersion) {
        // TODO Auto-generated method stub
         if(oldVersion < newVersion){
                db.execSQL("DROP TABLE IF EXISTS " + MyContentDescriptor.Categories.TABLE_NAME);

            }
    }
}

Here we defined out database name and write sql query for the creation of Categories table. (its not created yet).

Now come to the ContentProvider: We will use both of the above classes in our content provider. You can put all this code in Contentprovider class but its better to keep these separate for organization and readability. Lets create our contentprovider e.g MyContentprovider:


public class MyContentProvider extends ContentProvider {

    private MyDatabase mydb;
    @Override
    public boolean onCreate() {
        // TODO Auto-generated method stub
        Context ctx = getContext();
        mydb = new MyDatabase(ctx);
        return (mydb == null) ? false : true;
    }

    @Override
    public int delete(Uri uri, String selection, String[] selectionArgs) {
        // TODO Auto-generated method stub
         SQLiteDatabase db = mydb.getWritableDatabase();
         int token = MyContentDescriptor.URI_MATCHER.match(uri);
         int count=0;
        
         switch(token){
         case MyContentDescriptor.Categories.CAT_PATH_TOKEN:
            count= db.delete(MyContentDescriptor.Categories.TABLE_NAME, selection, selectionArgs);
             break;
         }
        getContext().getContentResolver().notifyChange(uri, null);
        return count;
  
    }

    @Override
    public String getType(Uri uri) {
        // TODO Auto-generated method stub // returning self defined mime types
        // to be used by other applications if any
        return null;
    }

    @Override
    public Uri insert(Uri uri, ContentValues values) {
        // TODO Auto-generated method stub

        Log.d("sohail", "inside insert");
        SQLiteDatabase db = mydb.getWritableDatabase();

        int token = MyContentDescriptor.URI_MATCHER.match(uri);
        switch (token) {
        case MyContentDescriptor.Categories.CAT_PATH_TOKEN: // uri is of
                                                            // categories table
            Log.d("sohail", "matched uri is CAT_PATH_TOKEN:" + uri.toString());
            long id = db.insert(MyContentDescriptor.Categories.TABLE_NAME,
                    null, values);
            // notifying change to content observers
            getContext().getContentResolver().notifyChange(uri, null);
            return MyContentDescriptor.Categories.CONTENT_URI.buildUpon()
                    .appendPath(String.valueOf(id)).build();

        default:
            throw new UnsupportedOperationException("URI: " + uri
                    + " not supported.");
        }
    }

    @Override
    public Cursor query(Uri uri, String[] projection, String selection,
            String[] selectionArgs, String sortOrder) {
        // TODO Auto-generated method stub
        Log.d("sohail", "query called");
        SQLiteDatabase db = mydb.getReadableDatabase();
        SQLiteQueryBuilder queryBuilder = new SQLiteQueryBuilder();
        Cursor c;
        int token = MyContentDescriptor.URI_MATCHER.match(uri);

        switch (token) {

        case MyContentDescriptor.Categories.CAT_PATH_TOKEN:
            Log.d("sohail", "matched uri is CAT_PATH_TOKEN:" + uri.toString());
            queryBuilder.setTables(MyContentDescriptor.Categories.TABLE_NAME);
            c = queryBuilder.query(db, projection, selection, selectionArgs,
                    null, null, sortOrder);
            return c;

        case MyContentDescriptor.Categories.CAT_PATH_FOR_ID_TOKEN:
            Log.d("sohail", "matched uri is CAT_PATH_TOKEN:" + uri.toString());
            queryBuilder.setTables(MyContentDescriptor.Categories.TABLE_NAME);
            queryBuilder.appendWhere(MyContentDescriptor.Categories.Cols.cat_id
                    + "=" + uri.getLastPathSegment());
            c = queryBuilder.query(db, projection, selection, selectionArgs,
                    null, null, sortOrder);
            return c;

       default:
            Log.d("sohail", "no URI MATCHED");
            return null;
        }

    }

    @Override
    public int update(Uri uri, ContentValues values, String selection,
            String[] selectionArgs) {
        // TODO Auto-generated method stub
         SQLiteDatabase db = mydb.getWritableDatabase();
         int token = MyContentDescriptor.URI_MATCHER.match(uri);
         int count=0;
        
         switch(token){
         case MyContentDescriptor.Categories.CAT_PATH_TOKEN:
            count= db.update(MyContentDescriptor.Categories.TABLE_NAME,values, selection, selectionArgs);
             break;
            }
        
        getContext().getContentResolver().notifyChange(uri, null);
        return count;
        
    }

}

Mycontentprovider is exented from contentprovider and its methods: Insert,query,delete,update getType needs to be implemented. We create a database db in onCreate. This object is used in insert,query update and delete methods. Uri matcher is used to match the requested URI and on the basis of this uri, query is executed on particular table. (there could be more than one table). db.insert, db.update and db.delete are all sqlite funcitons. SQLite queryBuilder is used to query the specific table as indicated in URI. Results of the query are returned in Cursor object (which in-turn is used to populate UI e.g listView). On each insertion, new id of the inserted row is appended in URI and returned e.g after insertion of 3rth record the returned URI will be:

     content://sohail.aziz.mycontentprovider/categories/3


this URI can be used to query the 3rd record (row) in categories table. Notice one thing that after insert, delete and update operation
getContext().getContentResolver().notifyChange(uri, null); is called. This notifies the content observers that the particular table has been modified. Thats all for the implementation of the contentprovider. Lets see how can we use it in our activity. Lets say we have two edit text and a check box named etID, etName and cbStatus.
private void InsertRecords() {
  // TODO Auto-generated method stub
  ContentValues conval=new ContentValues();
  conval.put(MyContentDescriptor.Categories.Cols.key_1_catid, etID.getText().toString() );
  conval.put(MyContentDescriptor.Categories.Cols.key_2_catname, etNAME.getText().toString());
  
  String stat;
  if(cbStatus.isChecked())
   stat="true";
  else
   stat="false";
  
  conval.put(MyContentDescriptor.Categories.Cols.key_3_catstatus,stat);
  recent_uri=getContentResolver().insert(MyContentDescriptor.Categories.CONTENT_URI, conval);
  Log.d("sohail","returned uri="+recent_uri);
  //showRecords();
  
 }
private void showRecords() {
  // TODO Auto-generated method stub
  
   cur= this.getContentResolver().query(MyContentDescriptor.Categories.CONTENT_URI, null, null,null, null);
  
  String[] colums=new String[]{MyContentDescriptor.Categories.Cols.key_1_catid,MyContentDescriptor.Categories.Cols.key_2_catname};
  //adapter= new SimpleCursorAdapter(this,android.l)
   int[] to = new int[] { R.id.tvID, R.id.tvNAME };
   
   adapter = new SimpleCursorAdapter(this, R.layout.list_item, cur, colums, to);

   listview.setAdapter(adapter);
  
   
 } 
private void deleteAll() {
  // TODO Auto-generated method stub
  getContentResolver().delete(MyContentDescriptor.Categories.CONTENT_URI, null, null);
 }
private void showRecent() {
  // TODO Auto-generated method stub
  Cursor cur2= this.getContentResolver().query(recent_uri, null, null,null, null);
  adapter.changeCursor(cur2);  
  
 }
private void showchecked() {
  // TODO Auto-generated method stub
  boolean status=true;
  String colname=MyContentDescriptor.Categories.Cols.key_3_catstatus;
  Uri uri= MyContentDescriptor.Categories.CONTENT_URI;
  String selection= MyContentDescriptor.Categories.Cols.key_3_catstatus+"=?";
  Cursor cur3=getContentResolver().query(uri, null,selection, new String[]{"true"}, null);
  Log.d("sohail",cur3.toString());
  
  adapter.changeCursor(cur3);
  
  
  } 

Functions Description:
Insert: to insert new record.
showRecords: to show all records of categories table.
showRecent: to show the recently inserted record.
showChecked:to show all records where status=true.
deleteAll: to delete all records from categories table.

Browse and download source
MyContentProviderExample.

*Update* : Content provider does not provide synchronization by default, which means there can be synchronization issues if content provider is accessed (insert/update) from many threads/apps at once. However Sqlite does provide the synchronization. You need not to do anything if your ContentProvider is backed by Sqlite database. For detail explanation read SQLite, ContentProviders, and Thread Safety.

Tuesday 22 May 2012

https hijacking! How to protect yourself?

Sorry for being late, I was out of the town for few days. Lets start from where we left. As we discussed in previous post, People surfing the web even over https connections are not safe. In today’s post I’d explain how we can protect ourselves from potential https hijacking with little security consciousness.
All major browsers (IE, Firefox, Chrome, Opera) come with the major certificate authorities certificates (CAs) pre-installed. You can view these certificate authorities i.e for firefox some versions:go to
Edit -> Preferences -> Advanced -> Encryption -> View Certificates -> Authorities.
This means your browser already trust VeriSign, DigiNotar, Thawte etc and any website having its certificate signed by these CAs is considered safe and trusted (because CA only issued certificates after verifying their identity). Thats why all well-know websites get certificates from these CAs e.g google from Thawte, twitter from VeriSign etc. We can assume that whenever there is https certificate from untrusted CA there are more chances that this could be a hijacked connection or the website it-self is a malicious website.
Now what we can do as security conscious e-user is: to simply reject no-secure untrusted https connections. This is the best and ONLY way to protect yourself in cyber world.
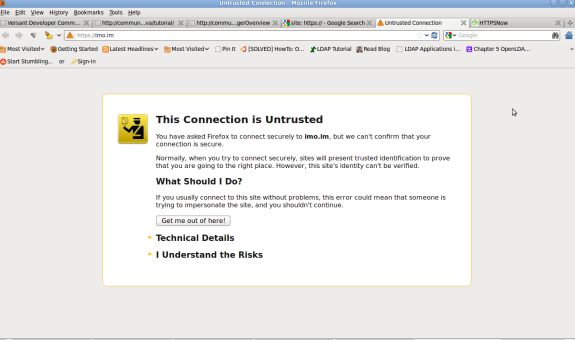
So how can we identify whether the site’s certificate is trusted or not ? Very simple, All major web-browsers show a security warning whenever we visit a (https enabled) website with untrusted certificate (whose issuer is not in our (browser) CA list). What we should do is, not continue surfing that particular website. Here is how firefox shows warning whenever we visit untrusted site.


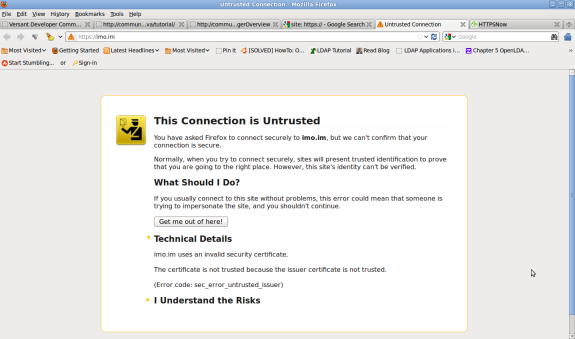
checking the details shows you the reason for untrust e.g issuer not trusted other reasons could be “certificate expire”


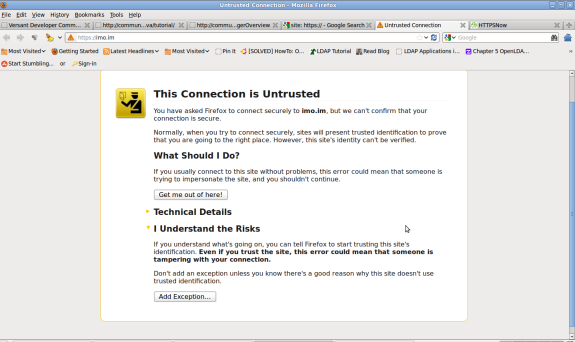
You can check the certificate itself and its issuer by clicking add exception:


Get the certificate and check its issuer.


DON’T confirm security exception, this will cause that certificate a trusted one and your browser won’t complain any more.
Note: I deliberately delete thawte SSL CA from browser CA list in order to produce these warnings. imo.im is not malicious :)

https:// Are you really protected ?

Myth: If I am using https:// enabled site, all my communication is secure and no one can intercept and understand in-between.
This is a very popular myth. As technology gets-into our lives, we start relying on it. We use internet not only on PCs and desktops but also on Tablets and Mobiles. We use it for our daily lives, for simple ordinary search to social e-gatherings, for simple email to online banking. It has become an important media for our daily mundane tasks.
As we are using it:
  • Is it really secure?
  • Can we use it without the sacrificing our privacy?
  • Can we be confident about the confidentiality of our personal information?
  • Are we really protected against e-theft?
Military and defense organizations all over the world, employs various means to secure their communications.I am writing this for the general public. For those,who are not as important as Top Military Officers but they do care about their PRIVACY:
  • For those who want their privacy be respected while online.
  • For those who want their usernames/passwords to be secret.
  • For those who are conscious about their e-transactions.
There is no doubt that https:// has become de-facto standard for secure web browsing. Its used by all security sensitive web sites. You can see it working while using gmail, hotmail, yahoo etc. It do provide a mechanism for encrypted communication between user’s browser and website.You can read more about the functionality of https in my previous article https:// what it is?
Today I’ll try to explain the scenarios when an https:// enabled communications be intercepted and understood.First of all there should be no doubt that your communication with a website can be intercepted. It can be intercepted at your local LAN, at your ISP, and at any location between you and the website. However eavesdropper(interceptor) will not be able to get anything out of it as everything is encrypted with strong enough algorithm.
Now come to the point. Then, how https:// can be insecure?I my last tutorial about functionality of https://, I have talked about the certificates. Which are used to encrypt everything between website and web browser. Now lets see how an eavesdropper can intercept and decrypt your communications:


Lets explain the steps quickly:
  1. User request a website e.g www.gmail.com
  2. Attacker is in-between, let the request go to gmail
  3. gmail respond with its certificate, attacker keep that certificate, send user his/her own certificate
  4. User browser shows a warning to accept certificate
  5. If user accept, all communication between user and attacker will be encrypted but with ATTACKER’s certificate
  6. Attacker decrypt the traffic and encrypt again with google’s certificate and forward the request to google
  7. This way attacker just encrypt and decrypt between user and google (site) which is transparent to both user and google site.
Have a question? ask!
Very soon, Next post: how to protect yourself from https:// hijacking.

https:// what it is ?

Https is way of securing http(web) traffic. There are many versions of establishing encrypted http connection but we will discuss here only the simplest one, used by most of the web sites running on https. Examples of these can by encrypted.google.com , gmail.com etc. Whenever there is an https (encrypted connection) you will notice https:// in the address bar of the browser.


There are two main purpose of generally used https:


  1.  Privacy: Providing encrypted traffic between client application (web browser) and the server application (web server) so that  no one can understand the content if he/she intercepts in-between.
  2. Authenticity: Guaranteeing the user that he/she is  connected with the genuine web server (no the fake one) .  


Lets understand how is this achieved in web browser-to-website communication.


Every well know web applications/web sites/ email applications get a SSL certificates from well known Certificate Authorities(CA) These certificate authorities are companies who issue Certificates after verifying the presented identity of the website's company. This information may include the address,emails,national id cards,phone no and other information of the site owner. In other words Certificate authorities certify that the web site is valid/genuine and its identity is verified.


There are many well known (trusted) Certificate Authorities (CA) like VeriSign Inc, DigiNotar, thawte, Inc etc. All web-browser come shipped with the certificates of these CAs.


No lets see what happens when web-browser request a https enabled website e.g gmail.com:
  1.  Client web browser send request to gmail.com on plain http.
  2. gmail.com replied with the its ssl-certificate and ask for secure connection (https).
  3.  Client web browser checks whether the issuer of this certificate exists in my list of trusted CAs.
  4.  If issuer is there , https connection established otherwise user is presented with the security warning (firefox).


Once the https connection is established, all the traffic from client (browser) to server (website) is encrypted and cannot be read/understood if intercepted in between. And user has guarantee that he/she is connected with the genuine website (no fake).


PS: You can check the list of CAs in your browser, in firefox , go to edit->Prefrences or tools->Prefrences  then Advanced->Encryption->View Certificates there you can see the list of trusted Certificates and Certificate Authorities.